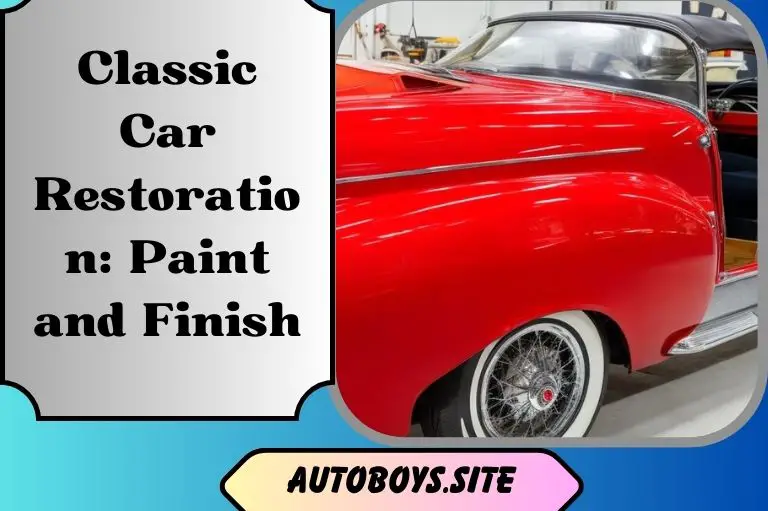
The Secret to a Show-Stopping Classic Car Restoration: Paint and Finish
The gleaming, mirror-like paint finish of a fully-restored classic car captures attention and admiration like few other details. For the dedicated classic car restorer, choosing the right paint and perfecting the finish is an art form in itself. The shimmering, lustrous exterior is the culmination of hours of painstaking work preparing the surface, applying multiple coats of primer and paint with precision, and waiting patiently while each layer dries and cures to a durable, glossy sheen. The final result, when done properly, appears seamless and transforms the vehicle into a showstopper.
For those embarking on a classic car restoration, the paint and finish should not be an afterthought. With the right products, techniques, and commitment to quality, a flawless paint job can turn a forgotten relic into an automotive masterpiece and the crown jewel of any collection. The secret to success is in the preparation and details.
Prep Is Key: Properly Preparing the Surface for Paint
To achieve a show-stopping paint job on a classic car restoration, preparation is key. Properly preparing the surface before painting will help the new coat adhere better and last longer.
Sanding and Priming
Sanding the surface smooths imperfections and provides a “tooth” for the paint to grip onto. Start with coarser grits of sandpaper, working to progressively finer grits. Wipe away dust with tack cloths to ensure a clean surface. Apply a high-quality primer suited for automotive use. Let the primer dry as directed before sanding lightly with a fine-grit sandpaper.
Cleaning and Degreasing
Scrub the entire car with a degreasing agent to remove built-up grime, wax, and oils. Use a light detergent and water, changing the water frequently. Rinse well and dry with a microfiber towel to prevent water spots. Clean the wheels and wheel wells, door jambs, engine bay, and trunk. Vacuum the interior and wipe down vinyl and plastic parts.
Sealing Seams and Imperfections
Inspect the body for any holes or imperfections and seal them. Apply a plastic or metal-based filler compound, let dry, and sand smooth. Seal seams around doors, hoods, and trunk lids with a bead of caulk, seam sealer, or weatherstripping tape. Remove trim, handles, mirrors, and accent parts for separate painting or polishing.
With meticulous preparation and attention to detail, a classic car can be restored to its former glory. The rewards of a perfect paint job are well worth the effort required. By starting with a clean slate and properly prepping the surface, the new vibrant coat of paint will adhere flawlessly, making the car gleam as it did rolling off the showroom floor.
Choosing the Right Paint for Your Classic Car Restoration
For a show-stopping classic car restoration, choosing the right paint and finish is crucial. The paint color and type should match what was originally used by the manufacturer, so research to determine the exact shade and paint code.
Finding the Original Paint Color
Many resources are available to find a car’s original factory paint color, such as vintage marketing materials or by checking under-trim pieces where the original paint may still be intact. Single-stage urethane paint systems provide an authentic finish at an affordable price. Enamel and lacquer were common in earlier models.
Paint Options for Restoration
Once you’ve selected a color, determine the appropriate paint system. Urethane paint creates a durable, glossy finish that cures quickly. Enamel paint produces a smooth, glossy coat but takes longer to dry. Lacquer paint gives a period-correct finish for many classic cars but requires multiple coats and has strong fumes.
For the best results, prepare the surface thoroughly, apply multiple thin coats of paint, and allow adequate drying time between coats. Carefully following the product directions will achieve a seamless, high-quality finish. With patience and the right technique, a flawless paint job can make a stunning difference in a classic car restoration.
Achieving a Show-Stopping Finish
A proper finish requires sanding, priming, and cleaning the surface before painting. Apply 2-3 coats of color, waiting 15-30 minutes between coats, then 2-3 coats of clear topcoat with the same drying time. After the final coat, wait at least 24 hours before lightly buffing and waxing.
With dedication to authenticity and detail, choosing the correct paint and finish system can make a classic car restoration a true showstopper. The rewards of a museum-quality paint job are well worth the investment of time and resources.
Vintage Car Restoration Paint Techniques for a Flawless Finish
Achieving flawless paint restoration for a classic car requires meticulous surface preparation and the proper techniques.
Surface Preparation
The surface must be properly prepared before painting. This includes sanding, priming, and cleaning. Lightly sanding the repaired area using fine-grit sandpaper helps level the paint and smooth out any imperfections. All rust or damage must be repaired. The area should then be primed to provide a base for the new paint. Finally, the entire car should be cleaned to remove any dirt or debris.
Paint Application
The paint should be applied in thin, even coats, allowing each coat to dry as directed by the product specifications before applying additional coats. Spray-on paint application using a spray gun is typically best for a high-quality finish. Multiple light coats are better than one heavy coat. Each coat should be applied using even, overlapping strokes. All doors, hoods, and trunks should be removed or taped off for separate painting.
Curing and Protection
The paint must cure completely before the final finish is applied. A clear topcoat, like polyurethane, protects from environmental damage. Multiple coats of clear topcoat should be applied, allowing it to dry between applications. The final result should have a deep, glossy shine and smooth finish.
Metallic Finishes
Restoring an oxidized single-stage metallic finish is the hardest thing to do when restoring antique and original paints. The metallic flakes in the paint tend to fade and dull over time. Reproducing an authentic metallic finish requires a skilled hand and an artistic eye. Custom mixing paint to match the exact color and metallic tone of the original finish is often necessary for the most accurate restoration.
With meticulous preparation, the proper techniques, and a skilled hand, a flawless paint restoration that highlights the unique beauty of a classic car can be achieved. The result will be a show-stopping vehicle that turns heads at any car show.
Curing and Drying: Allowing the Paint to Fully Cure
The paint on a classic car restoration requires ample time to cure to achieve an optimal, durable finish. As paint dries, the solvents in it evaporate, leaving behind the pigment and binder. However, the chemical reaction that creates the hardest, glossiest surface is curing. This process can take weeks or months to fully complete depending on the type of paint used.
Curing Oil-Based Paint
Oil-based paints typically cure faster than latex paints, often within 3 to 7 days. However, oil-based paints release volatile organic compounds (VOCs) as they cure, creating strong fumes. Restorers must ensure proper ventilation and consider wearing a respirator. Once the surface is tack-free, meaning it’s no longer sticky to the touch, restorers can begin wet sanding and buffing to create an ultra-smooth finish. Multiple coats of clear topcoat are then applied and allowed to cure for several days before the final polish.
Curing Latex Paint
Latex or acrylic enamel paints are popular for restoration projects thanks to their water-based, low-VOC formulas. However, they require significantly more time to fully cure, around 2 to 4 weeks. Restorers must resist the urge to wet sand or buff the paint during this period. Doing so could damage the finish by pulling the not-yet-fully cured paint from the surface. Latex paint cures through the slow evaporation of the water in the paint as oxygen interacts with the latex polymers. This reaction hardens the paint into a durable plastic coating. Only once the paint is fully cured can restorers begin polishing and applying a protective topcoat.
The curing process is a practice in patience but also a science. Carefully controlling temperature, humidity, and ventilation will help create the strongest, most lustrous paint finish for any classic car restoration. Shortcutting the curing period often leads to disastrous results. By understanding how different paint types cure and dry, restorers can make informed decisions to achieve a show-stopping finish.
Show Stopping Results: How the Right Paint and Finish Makes Your Classic Car Stand Out
The final step in any classic car restoration is applying the perfect paint and finish. This is what truly brings a vintage vehicle back to showroom condition and helps it stand out at car shows.
Preparation Is Key
Proper preparation is essential for a glossy, durable finish. Sanding the entire car removes imperfections and provides a “tooth” for the new paint to grip onto. Primer fills in tiny scratches and creates an even base coat. Thorough cleaning removes all dust or debris.
High-Quality Products
Using high-quality products specifically designed for automotive restoration will yield professional results. Enamel or urethane paints provide a hard, glossy finish that stands up well to environmental damage. A clear topcoat protects the new paint and enhances the depth of color. For the highest shine, a glaze or swirl remover can be applied before the final wax or sealant.
Patience and Precision
Applying the new paint in multiple thin, even coats with adequate drying time in between allows each coat to cure properly. Rushing the job often leads to drips, streaks, or uneven coverage. Carefully painting the door jambs, engine bay and trunk in complementary colors shows attention to detail.
The Finishing Touches
Wet sanding the final coat with ultra-fine grit paper creates an ultra-smooth surface. Buffing and polishing bring out a mirror-like shine. Adding pinstripes, custom graphics or airbrushed details provides a unique finishing touch.
With quality products, meticulous preparation, and patience, any classic car restoration can achieve a show-stopping finish. The right paint and polish transform a vintage vehicle into a true work of art. A glossy, flawless paint job and complementary custom details will make any classic car the star of the show.
Conclusion
A pristine paint job and flawless finish are what makes a classic car restoration truly shine. With meticulous surface preparation, the careful application of high-quality paints, and sufficient curing time, any classic car enthusiast can achieve a showroom-quality result. When done properly, a stunning new paint finish becomes the crowning glory of hundreds of hours of work and thousands of dollars invested into a restoration.
For the classic car expert, there are few greater thrills than unveiling a freshly painted masterpiece to an admiring crowd of onlookers. With the right techniques and products, that thrill can be yours.